配置Mu Editor和Micro:bit
Mu Editor是一款具有友好GUI界面的MicroPython集成开发工具,包含了代码编辑、烧录、REPL终端、串口绘图器等功能。通过Micro:bit主板控制小MU视觉传感器,需要使用包含了MUVisionSensor传感器的MicroPython固件,请按以下步骤进行设置:
(1)下载Micro:bit固件:
GitHub:https://github.com/mu-opensource/MuVisionSensor3-MicroPython
morpx官网:http://mai.morpx.com/page.php?a=sensor-support
(2)更新Micro:bit固件:
将Micro:bit通过USB线连接电脑,出现Micro:bit的磁盘,将下载的固件microbit-micropython-MuVisionSensor-x.x.x.hex 文件拖入磁盘中,Micro:bit将自动更新固件并重启。
(3)下载并安装Mu Editor:https://codewith.mu/
(4)导入传感器
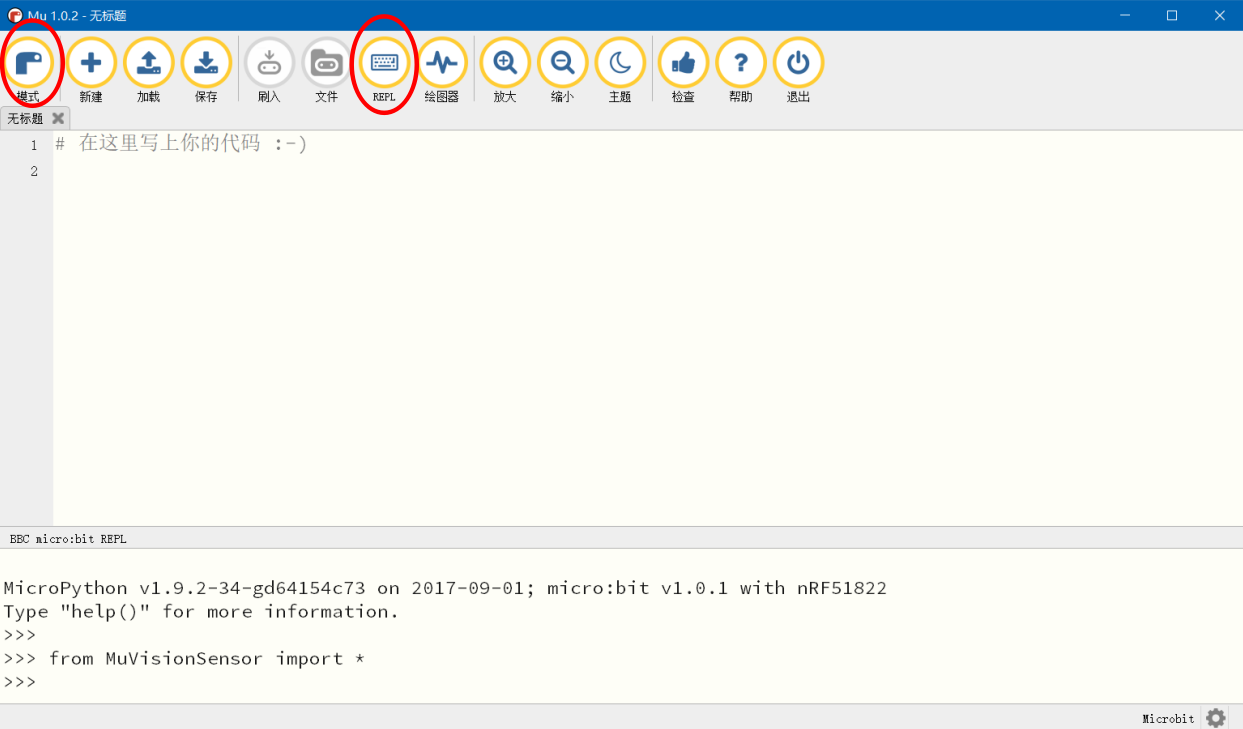
打开Mu Editor,在顶部选择模式为 BBC micro:bit,连接micro:bit后左下角显示连接到新的micro:bit 设备即可进行编程。单击顶部REPL按钮进入串口实时模式,micro:bit将返回固件版本信息。输入:
>>> from MuVisionSensor import *
导入传感器后即可使用MuVisonSensor类中的所有公开API
*MuVisionSensor传感器中关键字的自动补全仅在REPL模式下可用
Micro:bit硬件连接
MU Vision Sensor 3的外设和接口如图所示:
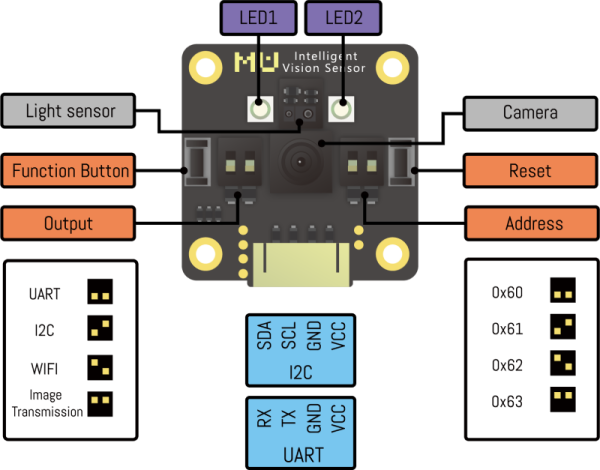
(1)将传感器左侧输出模式拨码开关1拨至下方,2拨至上方;
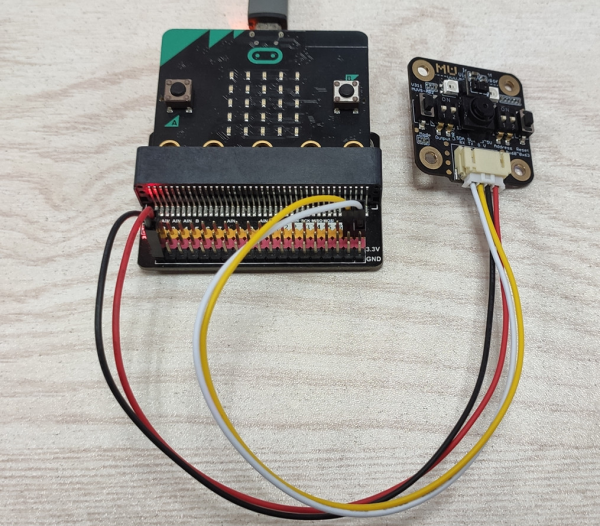
(2)将传感器输出接口SDA引脚(P1)和SCL引脚(P2)接至Micro:bit 对应的 SDA引脚(P20)与SCL引脚(P19),同时将P3接地,P4接电源(3.3-5V);
(3)将传感器的地址选择拨码开关拨至对应位(默认地址0x60则 1、2都在下方,不推荐修改此设置)。
*目前仅支持I2C模式
API使用说明
MuVisionSensor 库内所有的的函数及可选参数的枚举可以通过以下代码获取:
import MuVisionSensor                   #导入库
help(MuVisionSensor)                    #获取可选枚举类型
help(MuVisionSensor.MuVisionSensor)     #获取所有函数
构造函数
API:
实例化一个对象,并指定传感器地址,指定的地址要与地址选择拨码开关的设置保持一致,默认地址为0x60
MuVisionSensor.MuVisionSensor(address=0x60)
开启算法
API:
MuVisionSensor.VisionBegin(vision_type)
目前支持的vision_type有:
VISION_COLOR_DETECT 颜色检测
VISION_COLOR_RECOGNITION 颜色识别
VISION_BALL_DETECT 球体检测
VISION_BODY_DETECT 人体检测
VISION_SHAPE_CARD_DETECT 形状卡片检测
VISION_TRAFFIC_CARD_DETECT 交通卡片检测
VISION_NUM_CARD_DETECT 数字卡片检测
VISION_ALL 开启所有算法
示例:
from MuVisionSensor import *                #导入库
mu=MuVisionSensor(0x60)                     #实例化MU变量
mu.begin()                                  #初始化MU

mu.VisionBegin(VISION_COLOR_DETECT)         #开启颜色检测算法
mu.VisionBegin(VISION_SHAPE_CARD_DETECT | VISION_BALL_DETECT) #同时开启形状卡片检测和球体检测算法
设置算法性能
API:
MuVisionSensor.VisionSetLevel(vision_type, level)
可选的vision_type同上
可选的level有:
LevelDefault 默认
LevelSpeed 速度优先
LevelBalance 平衡
LevelAccuracy 准确性优先
示例:
mu.VisionSetLevel(VISION_BALL_DETECT, LevelSpeed)
设置摄像头帧率模式
高帧率模式下识别速度增加,同时功耗增加
API:
MuVisionSensor.CameraSetFPS(mode)
可选的mode有:
FPSNormal 正常模式
FPSHigh 高帧率模式
设置摄像头白平衡
调节因为外界光源变化而引起的图像偏色
API:
MuVisionSensor.CameraSetAwb(mode)
可选的mode有:
AutoWhiteBalance 自动白平衡
LockWhiteBalance 锁定白平衡
WhiteLight 白光模式
YellowLight 黄光模式
设置摄像头数码变焦
API:
MuVisionSensor.CameraSetZoom(mode)
可选的mode有:
ZoomDefault 默认
Zoom1 变焦模式1
Zoom2 变焦模式2
Zoom3 变焦模式3
Zoom4 变焦模式4
Zoom5 变焦模式5
板载LED灯光设置
API:
MuVisionSensor.LedSetColor(led, detected_color, undetected_color, level)
参数说明:
led:要配置的LED灯,可选值为
Led1 板载LED1
Led2 板载LED2
LedAll 板载所有LED
detected_color:检测到结果时的颜色,可选值为
LedClose LED关
LedRed 红色
LedGreen 绿色
LedYellow 黄色
LedBlue 蓝色
LedPurple 紫色
LedCyan 青色
LedWhite 白色
undetected_color:未检测到结果时的颜色,可选值同上
level:亮度值,可输入0~15的数字,数值越大越亮
获取算法识别结果
API:
MuVisionSensor.GetValue(vision_type, object_inf)
vision_type的可选值同上
object_inf的可选值为:
Status 检测状态,0代表没检测到,1代表检测到
XValue 目标的横向坐标
YValue 目标的纵向坐标
WidthValue 目标的宽度
HeightValue 目标的高度
Label 目标的标签
RValue 红色通道值(颜色识别模式)
GValue 绿色通道值(颜色识别模式)
BValue 蓝色通道值(颜色识别模式)
光线传感器开启功能
开启光线传感器一项或几项功能
API:
MuVisionSensor.LsBegin(ls_type)
ls_type的可选值为:
LS_PROXIMITY_ENABLE接近检测
LS_AMBIENT_LIGHT_ENABLE环境光检测
LS_COLOR_ENABLE颜色检测
LS_GESTURE_ENABLE手势检测
光线传感器设置灵敏度
设置光线传感器灵敏度,该项设置对手势检测无效
API:
MuVisionSensor.LsSetSensitivity(sensitivity)
sensitivity的可选值为:
SensitivityDefault默认灵敏度
Sensitivity1灵敏度1
Sensitivity2灵敏度2
Sensitivity3灵敏度3
光线传感器读取颜色检测值
光线传感器读取颜色检测经白平衡校正后的值
API:
MuVisionSensor.LsReadColor(color_t)
返回颜色检测对应的值
color_t可选值有:
LsColorLabel颜色标签值
LsColorRed颜色红色通道值
LsColorGreen颜色绿色通道值
LsColorBlue颜色蓝色通道值
LsColorHue颜色色调值
LsColorSaturation颜色饱和度值
LsColorValue颜色亮度值
光线传感器读取颜色检测原始值
光线传感器读取颜色检测原始值
API:
MuVisionSensor.LsReadRawColor(color_t)
返回颜色检测对应的原始值
color_t可选值有:
LsRawColorRed颜色红色通道原始值
LsRawColorGreen颜色绿色通道原始值
LsRawColorBlue颜色蓝色通道原始值
光线传感器读取手势检测结果
API:
MuVisionSensor.LsReadGesture()
返回手势检测对应的手势类型,可选值有:
GestureNone–0无手势
GestureUp–1上划手势
GestureDown–2下划手势
GestureLeft–3左划手势
GestureRight–4右划手势
GesturePush–5向前推进手势
GesturePull–6向后拉手势
示例程序
获取球算法结果
from MuVisionSensor import *        # import MuVisionSensor library
mu = MuVisionSensor()               # create MU
mu.begin()                          # initialized MU
mu.VisionBegin(VISION_BALL_DETECT)  # enable vision type: Ball
while True:
    if mu.GetValue(VISION_BALL_DETECT, Status):
        print("X = "+str(mu.GetValue(VISION_BALL_DETECT, XValue)))              # print X value
        print("Y = "+str(mu.GetValue(VISION_BALL_DETECT, YValue)))              # print Y value
        print("Width = "+str(mu.GetValue(VISION_BALL_DETECT, WidthValue)))      # print width
        print("Height = "+str(mu.GetValue(VISION_BALL_DETECT, HeightValue)))    # print height
    else:
        print("Nothing Detected")
获取颜色识别算法结果
from MuVisionSensor import *                # import MuVisionSensor library
mu = MuVisionSensor()                       # create MU
mu.begin()                                  # initialized MU
mu.VisionBegin(VISION_COLOR_RECOGNITION)    # enable vision type: Color Recognize
mu.CameraSetAwb(LockWhiteBalance)          # camera lock white balance
while True:
    if mu.GetValue(VISION_COLOR_RECOGNITION, Status):                   # if color deteced
        color_label = mu.GetValue(VISION_COLOR_RECOGNITION, Label)      # print color type
        if color_label == MU_COLOR_BLACK:
            print("Black")
        if color_label == MU_COLOR_WHITE:
            print("White")
        if color_label == MU_COLOR_RED:
            print("Red")
        if color_label == MU_COLOR_YELLOW:
            print("Yellow")
        if color_label == MU_COLOR_GREEN:
            print("Green")
        if color_label == MU_COLOR_CYAN:
            print("Cyan")
        if color_label == MU_COLOR_BLUE:
            print("Blue")
        if color_label == MU_COLOR_PURPLE:
            print("Purple")
获取光线传感器手势检测结果
from MuVisionSensor import *                # import MuVisionSensor library
mu = MuVisionSensor()                       # create MU
mu.begin()                                  # initialized MU
mu.LsBegin(LS_GESTURE_ENABLE)               # light sensor enable gesture
print("Gesture Dtetect Start:")
while True:
    gesture = mu.LsReadGesture()            # get gesture
    if gesture == GestureUp:
        print("gesture:up")
    if gesture == GestureDown:
        print("gesture:down")
    if gesture == GestureLeft:
        print("gesture:left")
    if gesture == GestureRight:
        print("gesture:right")
    if gesture == GesturePush:
        print("gesture:push")
    if gesture == GesturePull:
        print("gesture:pull")
获取光线传感器环境光、接近检测结果
from microbit import *
from MuVisionSensor import *                # import MuVisionSensor library
mu = MuVisionSensor()                       # create MU
mu.begin()                                  # initialized MU
mu.LsBegin(LS_PROXIMITY_ENABLE | LS_AMBIENT_LIGHT_ENABLE) # light sensor enable proximity/amblent light detect
while True:
    print("(proximity,%d)"%mu.LsReadProximity()) # read proximity
    print("(als,%d)"%mu.LsReadAmbientLight())    # read ambient light
    sleep(500)
获取光线传感器颜色检测结果
from microbit import *
from MuVisionSensor import *                # import MuVisionSensor library
mu = MuVisionSensor()                       # create MU
mu.begin()                                  # initialized MU
mu.LsWhiteBalanceEnable()                   # enable white balance
mu.LsBegin(LS_COLOR_ENABLE)                 # light sensor enable color detect
while True:
    # read color
    label = mu.LsReadColor(LsColorLabel)
    if label == MU_COLOR_BLACK:
        print("Label:Black")
    elif label == MU_COLOR_WHITE:
        print("Label:White")
    elif label == MU_COLOR_RED:
        print("Label:Red")
    elif label == MU_COLOR_YELLOW:
        print("Label:Yellow")
    elif label == MU_COLOR_GREEN:
        print("Label:Green")
    elif label == MU_COLOR_CYAN:
        print("Label:Cyan")
    elif label == MU_COLOR_BLUE:
        print("Label:Blue")
    elif label == MU_COLOR_PURPLE:
        print("Label:Purple")
    else:
        print("Label:Unknow")
    print("R:%d, G:%d, B:%d"%(mu.LsReadColor(LsColorRed),mu.LsReadColor(LsColorGreen),mu.LsReadColor(LsColorBlue)))
    print("H:%d, S:%d, V:%d"%(mu.LsReadColor(LsColorHue),mu.LsReadColor(LsColorSaturation),mu.LsReadColor(LsColorValue)))
    sleep(500)